Keynote, developed by Apple Inc as a part of the iWork family, is a software application used in making presentations. The latest Keynote 6.0 has made a reimagined leap forward in which the developer added some new features, a new user interface, vastly improved file compatibility with iOS platforms and Microsoft PowerPoint, new themes, effects and animation, and great export options.
However, although Keynote has a lot of new changes, it is still a hard time for users to embed YouTube video to Keynote when they want readers to understand what the presentation is expressing without making further explanation because Keynote now does not accept embedded videos within a presentation. Thus for the purpose of figuring out the solution, below is a complete set of solutions which can help you when it comes to inserting YouTube videos to Keynote.
Step One: Download YouTube videos on Mac
Before you embed YouTube in Keynote, the first thing that you need to know or do is to download YouTube videos on your Mac PC without any hassle and without a single cent to spend. Continue reading to see how it is done.
1
Method 1: Use an Online Free Video Downloader
Downloading a YouTube video will be as easy as 1,2,3 by using the Video Grabber tool, an online application which allows users to download any video from different sites for free. In addition, this tool is safe, fast and very reliable. You don’t actually need to install any application on your computer. All you need is a good internet connection. To get a video, just simply copy the URL of the video which later will be used to add YouTube videos to Keynote and paste it in the URL box found on the videograbber.net page. Next is to click the “Download” button to start the downloading of the video.
Tips: Aside from its downloading function, this tool can also help users in searching videos directly by clicking on the “Search Video” tab. You can also convert videos to Keynote friendly format. Additionally, you can make use of its screen recording function to just record the YouTube video if you would not like to download the whole video.
☆
Method 2: Use A Free Desktop Downloader for Mac
You can also utilize Video Grabber Pro for Mac to download the YouTube video before you insert YouTube videos to Keynote. This is a free desktop tool which allows users to download videos from a wide range of streaming video sites. To download a YouTube video using this tool, check out the steps below.
1
Download and install the program on your Mac
You can directly hit the download button to install the program or access the program page to know more about its features and functions before you install it.
2
Copy and paste the YouTube URL
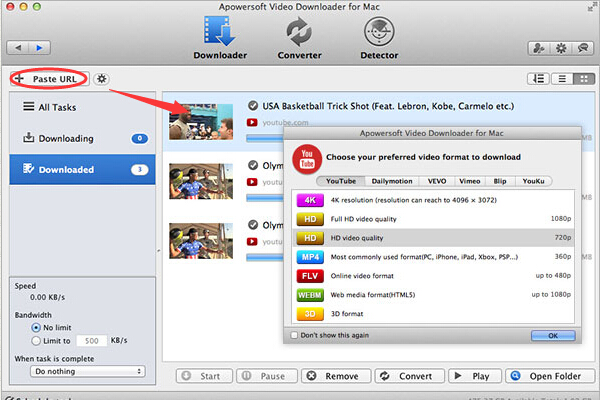
Launch the application and open the YouTube video that you want to download in your browser. Copy the video’s URL and click “Paste URL” found on the left part of the program.
3
Start to download the YouTube video
A new window then will pop up asking for the video format. Choose the video format that you want to use and then click “OK” to start downloading.
Tips: This thing features an auto video-detector. It can capture the video which is playing right now. Besides the downloading function, if you have videos which you pre-downloaded from YouTube onto your local disk but the format is not compatible with Keynote, you can use it to convert any video in any format.
Step Two: Embed YouTube Video in Keynote
After the downloading and conversion, the YouTube video can be workable with Keynote now. Continue proceeding with the following steps to finish the rest.
- Open Keynote.
- Click the “Insert” tab and select “Choose” and then choose the video file that you want to add.
- Click the “Insert” button and the video will then appear on Keynote.
Conclusion
That is the whole solution to embed YouTube in Keynote. Both tools are great, safe and easy to use. However, the desktop version is more advanced as compared with the online one. The online one cannot detect any video automatically and it cannot download multiple videos which the desktop tool can do. For a more detailed comparison between the two tools, refer to the table below.
| Methods | The Online One | The Desktop One |
|---|---|---|
| Pros | Quite easy to use, no installation, converter function, screen recording function | unable to download multiple videos at a time, easily influenced by the internet connection |
| Cons | Easy to use, download multiple videos instantaneously at a time, converter function, video detector | Need installation |