
What is Ken Burns Effect?
The Ken Burns Effect that is named after American documentarian Ken Burns is an effect of pan and zoom principally used on still images when videos are not available. This effect can achieve a near-broadcast-quality show. With the development of the film industry, everyday people can also received the opportunity to the use Ken Burns Effect on their videos nowadays with suitable video editors. In this article we collected some of the top Ken Burns Effect software you will be interested with.
Best Ken Burns Effect software for recommendation
ApowerEdit Ken Burns Effect
ApowerEdit is a professional video editing tool which has many helpful features which can help you reach your desired functions. It can merge videos, add narrations, mosaic videos and apply other animation elements to your project. When it comes to utilizing the Ken Burns Effect, you will find it is very easy to apply this effect to your video. And it allows you to preview the changes in real-time. The transition is very smooth from frame to frame. You’ll not realize a sudden change when this effect is added to your video. Check its how-to guide now.
- Download and install ApowerEdit to your computer if you haven’t had it already.
- Launch it, load files to the software by clicking “Import” > “Import file” or drag-and-drop.
- Drag the file to the video track in the timeline, select the video and move the playhead to the scene where you want to zoom.
- Click “Zoom” button in the toolbar and a yellow rectangular-shape frame will show in the top left section.
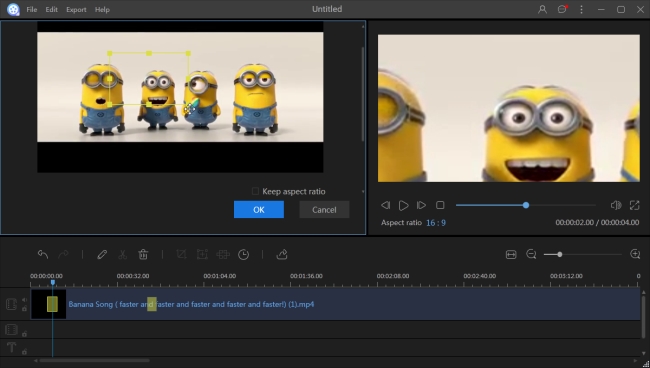
- Move that frame to the correct place and adjust the size of it. You can preview the effect on the right player at this point.
- In case you are satisfied, click “OK” and click the “Export” button in the toolbar to save the file to your computer.

iMovie Ken Burns Effect
Apple obtained the use of Ken Burns Effect for its video processing programs. With iMovie being the most basic one. You can easily add a zoom in and zoom out effect to your video clip in iMovie.
In order to apply the effect, import the video you want to edit to iMovie and add it to the timeline. Click the cropping button and you’ll see the cropping controls. Click the Ken Burns Effect and then two frames which are labeled Start and End will appear over the video in the player. To adjust the two frames, you can drag and resize them until the clips zoom in and zoom out as you want. You can preview the video if it is set well. To save the changes, click the “Apply” button on the top right corner of the player.

The Ken Burns Effect is great, but when it comes to photos, it interrupts your modifications, supposing that you want to create a slideshow from still pictures and add voiceover to it. iMovie will apply the effect to photos automatically. You can remove Ken Burns Effect by selecting all photos, right clicking it and going to adjustments, selecting Fit or Crop on the cropping window and the effect will be removed.
Final Cut Pro Ken burns effect
We just mentioned that Apple’s video production software supports Ken Burns Effect. Final Cut Pro also has the ability to apply the effect to your newly created video.
Aside from iMovie, another editing tool from Apple Inc is the Final Cut Pro. You can edit videos with this tool in a more professional way. It lets you merge, rotate, add effects, watermark, text and more. It even has the Ken Burns feature. Although the Ken Burns feature here is practically hidden.

To find and use Ken Burns Effect in Final Cut Pro, you need to select the file you want to edit, click the square “Transform” box and then find “Crop” so that you can enable the Ken Burns feature. Select “Ken Burns” button and then set the starting point with the green frame and the end point with the red frame. Save the file once you’re done with the modifications.
Adobe Premiere Ken Burns Effect
Last but definitely not the least on the recommendation list is the Adobe Premiere. This is a well-known tool for professional video editing. Compared to the other editing programs introduced at the earlier point, this one is the most complicated to use. It needs deeper learning and understanding before you manage to apply the Ken Burns Effect to your video.
Open Adobe Premiere and add the video footage to the timeline. In the media panel, select the video image and move it to which you want to use the pan and zoom effect for. Afterwards, drag it to the timeline and then from the menu bar, click “Tools” > “Pan & Zoom” icon. In addition to that, you can actually create a focus frame by simply moving the CTI to the position in the timeline where there is no other focus frame. For more info about the key frame, you can access the help center of Adobe.

Bottom Line
All recommended tools can be used to pan and zoom your video or picture. If you ask me for the best Ken Burns Effect software, I will highly recommend ApowerEdit for its simplicity and power. People with little knowledge about computer software can learn to use it in a fast way. If you have other suggestions, do not hesitate to leave them below. I’ll check them and update them to this article.