I recorded a personal video just a couple a days ago and have plans of sharing it. But the problem is that there are unfamiliar persons and unwanted things on the background that was captured on the video. I want to blur unnecessary images from my video clip; however I don’t have an idea on how to do it. I know it’s a little bit complicated to do, but can somebody help me to figure this thing out?
Methods to blur pictures in a video
There are some instances where in you want to get rid of some portion of your video that was taken unintentionally such as confidential matters like personal identity, social security numbers etc. This type of scenario happens most of the time on personal video recordings, and cutting a certain portion might affect the continuity of the video. In this case, the best solution is to blur the section that is not necessary.
However, how to blur picture on a video clip may be difficult for others to accomplish especially for beginners. Yes it’s a little bit confusing, but with the help of some programs it can be easily done without spending huge amount of money just to get expensive software to do the job. The most convenient way to blur image is by using video editing software which can create a blurred effect. And the most convenient video editor that can be utilized in this process is elaborated in two methods below.
Method one: windows live movie maker
In the first method we are going to make use of Windows Movie Maker, a known built-in video editor for all Windows OS users. This program has various effects for video editing, one of which is its blur effect.
1
Import video to Windows Live Movie Maker
To blur pictures using this video editor, the first step is to launch it, and import the video that you will be using with this project. You can do this by clicking the Add videos and photos button which is located at the menu panel at the top.
2
How to Add blur effects
When the video is on the tool’s board we can now start to add the blurring effect on the portion that we want to hide. Scan the whole videos and split those areas that we need to blur by hitting the Split function under edit menu. Once all done we can now finally apply the blur effect which can be found on the Visual Effect menu, just hit it and look for the Blur effect.
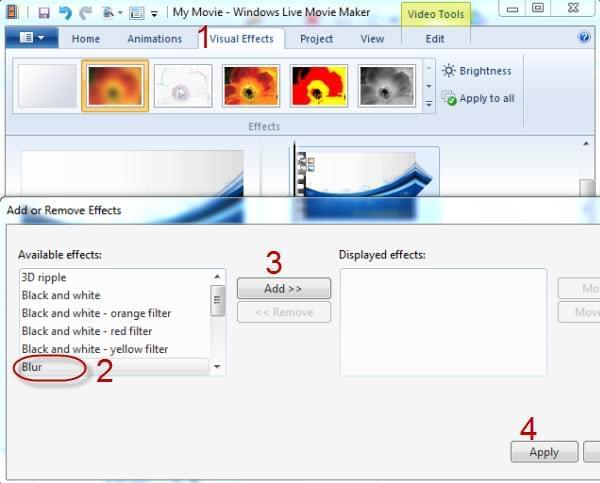
Make sure that the marker is set to place on the portion where blur will be applied. Repeat this process until you’re done with all the wanted areas is covered and save it afterwards.
In spite of blurring effect that can be done with this program, there are still some demerits that are tagged to it. One of which is the inability of the Movie Maker to blur on a specific area just like a person’s face of a certain item on the video, when the blur effect is applied the whole part of the video will be affected. And second, the blurring that in creates seems to be too mild that the portion that needs to be hiding is still a little bit visible.
Method two: ApowerEdit
Another blur picture editor available is ApowerEdit. This is a professional video editor that not only helps us blur any part of the video, but also boasts many advanced features when it comes to creating a video. We can add subtitles, apply filters/overlays/background music to video. And various templates are available. Let’s check the way to blur image in it.
1
Import your video
To begin with the project, we need to import the video that which will be using. Once importing is done, the video will be then showed in the Media Library on the top left. Drag it to the video track in the timeline for editing.

2
Start blurring your video
Now on the video track, Right click it and hit “Mosaic” in the Toolbar. Then a window will show immediately in which you can add a mosaic to the video. You can move the mosaic to the portion that you want to hide from the public view. You can preview the real-time effect in the right media player. Press “Ok” to apply the mosaic and the changes you’ve done to your video will be saved then.
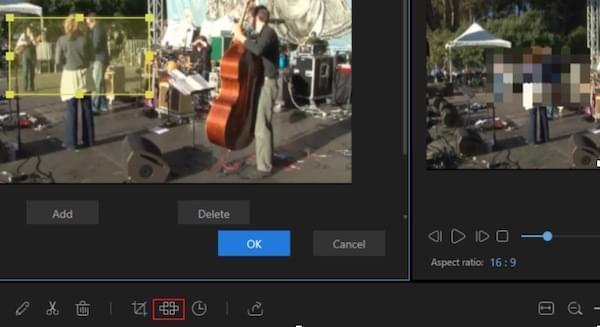
Note: This blur picture editor will apply the mosaic from the beginning to the end of the video. If you just want to set it to a part of the video instead of the whole one, you should split this part first and then add the mosaic.
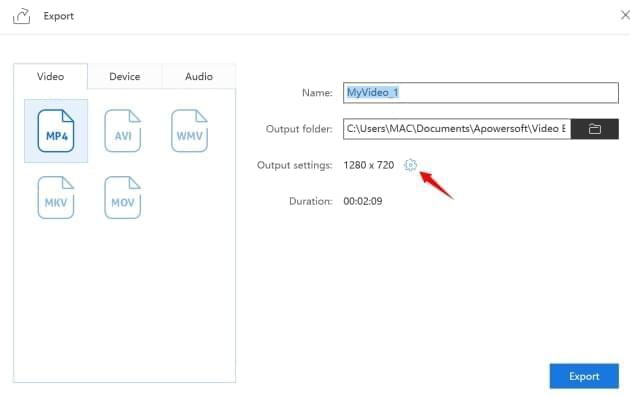
3
Output your blurred video
To save your newly blurred video, you should click “Output” button in Toolbar section. In the newly opened window, choose your preferred settings for the video like format, resolution, etc.
Blurring a specific portion of any video is a challenging task that we can experience every now and then. But it does not mean that it is not doable. By following the methods that is shown above, you can easily blur any video image that you want anytime you want.